Why “How to Measure a Bike” Matters
How to measure a bike with tingling hands, a sore back, or cramped knees, the problem usually isn’t the terrain—it’s how you measured the bike. Around 80% of fit issues on bikes come from incorrect sizing or poorly measured geometry, yet most riders still rely only on height‑based charts or guesswork.
Modern bikes—especially road, mountain, and gravel models—vary wildly in geometry. A “Large” from Brand A can feel like a “Medium” from Brand B because of changes in stack, reach, and seat‑tube slope instead of just raw frame length.
This guide will show you how to measure a bike both as a rider (inseam, torso, arms) and as a technician (frame, reach, stack, wheel size), so you can choose or tune a bike that fits your body, not just your country’s average height chart.
Tools You Need to Measure a Bike
You don’t need a professional fit rig to start. Here’s what really helps:
- Flexible tape measure – for inseam, standover, and basic frame lengths.
- Level or plumb line – to check vertical alignment on head tubes and seat‑tube measurements.
- Hard‑cover book or broom handle – to simulate a saddle when measuring inseam.
- Angle finder (phone app or small tool) – handy for checking stem angle and seat‑tube slope.
- Optional: laser level (≈$15‑30) – useful if you’re comparing multiple bikes or setting up a consistent indoor measuring spot.
With these, you can handle 90% of “how to measure a bike” tasks at home—no workshop required.
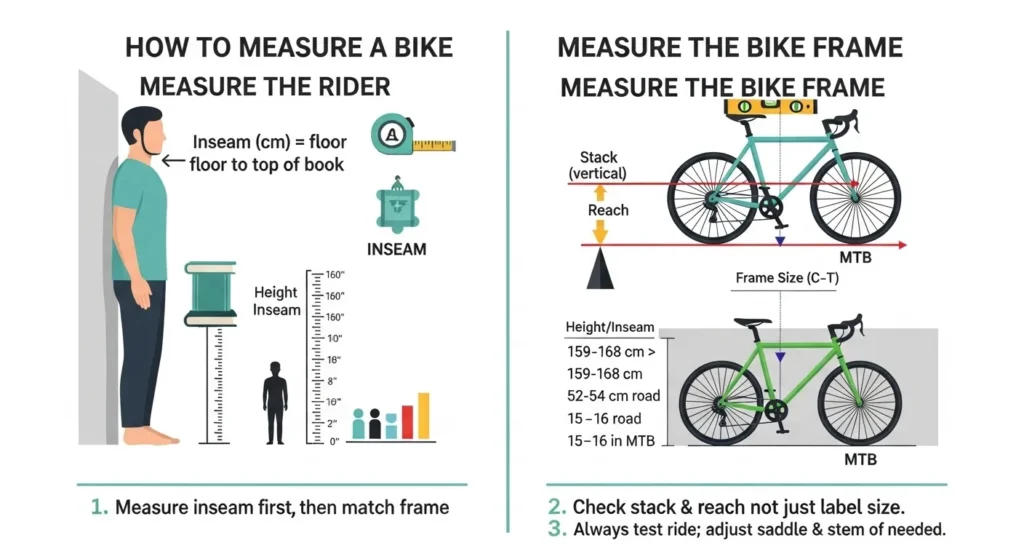
How to Measure Yourself First (The Rider)
Before you even touch a bike, the first step in how to measure a bike is measuring yourself. Sizing starts with your inseam, height, arm length, and torso proportions.
Step 1 – Measure Your Inseam
- Stand barefoot against a flat wall, feet 6–8 inches (15–20 cm) apart.
- Place a hard‑cover book or broom handle between your legs, as if it were a saddle.
- Slide it up until it’s snug (not painful), then mark where the top edge hits the wall.
- Use your tape to measure from the floor to that mark. That’s your inseam in centimeters.
This is the single most important number for how to measure a bike, especially for road and MTB.
Step 2 – Estimate Proper Frame Size
Use these formulas as starting points (fine‑tune later with test rides and charts):
- Road bike frame (cm) ≈ inseam (cm) × 0.67
- Mountain bike frame (inches) ≈ (inseam (cm) × 0.66) ÷ 2.54
Example:
If your inseam is 80 cm:
- Road frame ≈ 80 × 0.67 = 53.6 cm → round to 54 cm
- MTB frame ≈ (80 × 0.66) ÷ 2.54 ≈ 20.7 in → XXL or 21 in depending on wheel size.
Step 3 – Check Arm Length & Torso Reach
Frame size is just one piece; reach (how far your hands are from the saddle) matters too. To measure:
- Stand straight, arms relaxed.
- Measure from the outside of your shoulder to the wrist crease.
- If your arms are long relative to your torso, you may need a longer stem or deeper‑reach frame on road or gravel bikes.
Long arms and short legs can fit a larger effective top tube, but still need standover clearance.
How to Measure a Bike Frame (Basic Sizing)
Now that you know your body, it’s time to measure the bike itself. The method depends on the type: road, mountain, hybrid, or kids’ bike.
Road Bikes – Traditional C‑T Sizing
Most road frames are labeled by center‑to‑top (C‑T) seat‑tube length:
- Stand the bike upright against a wall.
- Find the bottom bracket (BB) center—where the crankset spins.
- Measure vertically from the BB center to the top of the seat tube (where the seat post clamps) vertically.
- The result (in cm) is your frame size.
For example:
- 48–50 cm for riders around 155–165 cm tall.
- 54–56 cm for 170–178 cm.
- 58–62 cm for 180+ cm.
If the seat tube is sloping, ignore the graphic line and still measure from the BB center to the clamp. That gives the effective frame size.
Mountain Bikes – Effective Top Tube & Labels
Modern MTBs often use S, M, L, XL, XXL instead of pure centimeters, but the idea is similar:
- Measure the bottom bracket center to the top of the seat tube as above.
- Check the effective top tube (horizontal distance from BB center to head‑tube center) if the frame is slope‑topped.
- Compare both numbers with the brand’s geometry chart (S = 13–14 in, M = 15–16 in, L = 17–18 in, etc.).
For many riders, 5’7”–5’10” (169–178 cm) fits an M/L frame with 17–18 in effective top tube.
Hybrid & City Bikes – Inseam‑Based Fit
Hybrids and city bikes are often sold by inseam‑based fit ranges (e.g., 15–17 in, 17–19 in).
- Stand the bike straight, right pedal forward at 6 o’clock.
- Measure from the top of the seat tube to the ground with the quick‑release or axle.
- Choose a frame that leaves 2–5 cm of standover clearance, depending on tyre size and handling preference.
Size Charts: Height, Inseam & Wheel Size
Below is a consolidated road / MTB sizing chart to help you cross‑check your measurements. Use this as a guide, then verify with your brand’s geometry tables.
| Height (cm/ft) | Inseam (cm) | Road Frame (cm) | MTB Frame (in) | Typical Wheel Size |
| 147–158 / 4’10”–5’2” | 64–71 | 48–51 | 13–14 | 26″ |
| 159–168 / 5’3”–5’6” | 72–79 | 52–54 | 15–16 | 27.5″ |
| 169–178 / 5’7”–5’10” | 80–86 | 55–56 | 17–18 | 27.5″–29″ |
| 179–185 / 5’11”–6’1” | 87–94 | 57–58 | 19–20 | 29″ |
| 186+ / 6’2”+ | 95+ | 59–62 | 21–23 | 29″ |
Rule of thumb:
- Wheel size should match your height and terrain:
- City & XC: 650b or 700c for road/gravel.
- Trail & enduro: 27.5″ or 29″ for MTB, depending on frame size and agility.
Even if your number lands in the middle of a range, you can test ride ±1 size and adjust via stem, saddle setback, and spacers.
Beyond Basic Size: Advanced Geometry Metrics
If you want to truly understand how to measure a bike, you can’t stop at frame length. Modern geometry focuses on stack and reach, not just seat‑tube size.
What Is Stack?
- Stack = vertical distance from thee bottom bracket center to a horizontal line at the top of the head tube.
- It tells you how tall the front of the bike feels.
- High stack = more upright, better for relaxed/touring bikes.
- Low stack = aggressive, aerodynamic (typical of race‑oriented road bikes).
How to measure the stack at home:
- Place the bike on level ground.
- Use a level on the top of the head tube.
- Drop a plumb line from that level to the floor.
- Measure the vertical distance from the bottom bracket center up to the top of the head tube.
What Is Reach?
- Reach = horizontal distance from bottom bracket center to head‑tube center.
- It dictates how far forward your handlebars are relative to your pedals.
How to measure reach:
- From the same setup, measure the horizontal distance from the BB center to the plumb line at the head tube.
- This is the frame reach; total rider reach also depends on stem length and handlebar width.
For riders comparing brands, stack‑reach charts are more reliable than “Medium vs Large” labels.
How to Measure Wheel Size & Standover
Even if the frame fits, wheel size and standover clearance can make or break how you measure a bike for comfort and safety.
Wheel Size (Quick Check)
- Look at the tyre sidewall: typical markings are 700c x 28mm, 26 x 2.0, 27.5 x 2.3, or 29 x 2.2.
- Measure diameter by:
- Lay the bike on its side.
- Measure from the floor to the top of the tyre.
- Compare with:
- 26″ ≈ 66 cm
- 27.5″ ≈ 70 cm
- 29″ ≈ 73–74 cm.
Standover Clearance
- Stand over the top tube in cycling shorts, both feet flat.
- There should be 2–5 cm clearance between the tube and your crotch.
- For aggressive trail or dirt bikes, some riders accept less clearance; for commuting, keep it safe.
Common Mistakes When Measuring a Bike
Most online guides on how to measure a bike are too simplistic, which leads to these frequent errors:
- Ignoring inseam and relying only on height – height is a rough guide, but inseam is what actually determines saddle height and standover.
- Measuring sloping tubes incorrectly – always measure from the bottom bracket center to the seat‑tube clamp, not to the end of the sloped tube.
- Using generic charts without checking geometry – two brands’ “Medium” MTBs can differ by several cm in reach and stack.
- Skipping wheel‑size awareness – a 29″ MTB may fit your height but feel clumsy on tight trails; a 26″ may feel cramped at 6’+ tall.
- Not test‑riding – even perfect measurements must be validated by riding; saddle height, stem length, and bar width can tune the fit.
Avoiding these mistakes turns a guess into a repeatable measurement process.
Kids’ Bikes: How to Measure a Child’s Bike
Measuring a kid’s bike is different: wheel size usually comes before frame size.
How to Measure a Kid’s Bike
- Measure height and inseam like an adult.
- Check the suggested wheel size for the age/height range:
- 12″ – 3–5 years
- 16″ – 5–7 years
- 20″ – 7–10 years
- 24″ – 10–13 years
- 26″ – 13+ years (junior MTB / road).
- Ensure the child can stand flat‑footed over the top tube with a bit of clearance.
For very young riders, “how to measure a bike” is more about wheel size and confidence than precise geometry.
When to Go Professional: Fit Tools & Services
For performance road, gravel, or serious MTB riders, basic measurements are just the starting point. A professional bike fit can dial in:
- Saddle height (using knee‑angle analysis).
- Stem length and angle.
- Cleat position and pedal‑to‑bottom‑bracket drop.
- Grip stack and reach (total hand‑to‑pedal position).
Popular tools/services include:
| Tool/Service | Approx. Cost (USD) | What It Measures |
| Fit Stick / FitRider | $200–$300 | Dynamic saddle, reach, and stack while riding |
| Retül / 3D Fit | $150–$300+ | 3D marker‑based motion analysis |
| Local bike shop fit | $80–$200 | Manual fit with laser levels, goniometers |
These are especially useful when switching between road, MTB, and gravel bikes, where geometry and riding position differ significantly.
Pros and Cons
Before you fully trust any “how to measure a bike” method, understand what measurements and charts each brings.
Pros of Manual Measurements
- Accurate to your body (inseam, arms, torso).
- Work for any bike type or brand, not just those with a chart.
- Let you spot‑check online size advice before buying.
- Essential for used bikes or custom builds.
Cons of Manual Measurements
- Require basic tools and time.
- Can be messy for beginners (e.g., tricky to drop a plumb line correctly).
- Don’t capture dynamic fit (how you move while pedaling).
Pros of Size Charts
- Quick, visual reference for height and inseam ranges.
- Helpful when comparing multiple brands before test‑riding.
- Useful for online shoppers who can’t try bikes in person.
FAQs
A:Stand the bike upright and measure from the center of the bottom bracket to the top of the seat tube (C‑T) in centimeters or inches.
A:Inseam matters more because it directly affects saddle height and standover clearance, while height is just a rough guide.
A: Stack is the vertical height from the bottom bracket to the head tube top, while reach is the horizontal distance from the bottom bracket to the head tube center.
A: Size charts are useful starting point,s but should be checked against your inseam, test ride, and actual frame geomet,ry like stack and reach.
A: Get a professional fit if you ride often, feel pain, or switch between very different bike types like road and MTB.
Conclusion
Getting the Right bike fit isn’t about guessing your size or blindly following a height chart—it’s about accurate measurement of both the rider and the bike. When you correctly measure your inseam, reach, and torso proportions, and match them with proper frame size, stack, and reach, you eliminate most common comfort and performance issues before they even appear.A properly measured bike gives you more than comfort. It improves pedaling efficiency, control, injury prevention, and long-term riding enjoyment—whether you’re on a road bike, mountain bike, or hybrid.