
How to Measure a Bike Frame Like a Pro: The Ultimate 2026 Precision Guide
Finding the perfect How to measure a bike frame is a lot like finding the perfect pair of boots. If they are a half-size too small, you’ll feel every mile in your bones. In the world of cycling, a frame that doesn’t fit isn’t just uncomfortable—it’s a recipe for chronic knee pain, lower back strain, and wasted watts.
Whether you are scouring the used market for a vintage steel roadie or configuring a high-torque 2026 electric mountain bike, the “manufacturer’s size” (Small, Medium, Large) is often a lie. One brand’s “54cm” is another brand’s “56cm.” To truly master your ride, you need to look past the stickers and understand the geometry.
In this comprehensive pillar guide, we are moving beyond basic “stand-over height.” We will explore the technical nuances of Virtual Top Tubes, the “Ape Index” for custom body proportions, and the specific measuring hacks that top-tier mechanics use to dial in a pro-level fit.
Why Accurate Bike Measurement is the Secret to Performance
Most riders assume that if they can stand over the top tube without “contact,” the bike fits. This is a myth. Proper bike measurement is about biometric alignment.
When your frame is sized correctly:
- Power Transfer: Your leg muscles hit the optimal extension, maximizing every pedal stroke.
- Aerodynamics: You can maintain a comfortable “tuck” without overstretching your spine.
- Injury Prevention: You eliminate the “reach-over” that causes shoulder impingement and the “cramped cockpit” that destroys knee cartilage.
In the 2026 market, where frame geometries are becoming increasingly aggressive and integrated, knowing your numbers is the only way to ensure your investment pays off in speed and comfort.
Essential Tools You Probably Already Have
You don’t need a $5,000 professional fit-jig to measure a bike accurately. You can achieve workshop-level precision with a few household items.
The Toolkit
- Metric Tape Measure: Always measure in centimeters (cm). Most global bike brands use metric sizing.
- A Thick Hardcover Book: This acts as a sliding square for measuring your inseam.
- A Carpenter’s Level (or Smartphone Level App): Crucial for finding the “Virtual Top Tube” on modern sloping frames.
- Masking Tape: To mark points on the frame without damaging the paint.
- A Friend (Optional but Recommended): To hold the bike upright while you take vertical measurements.
Measuring the Rider (The Body Geometry)
Before you touch the bike, you must know your own “Biological Baseline.” Two people who are both 180cm tall can require vastly different bikes if one has long legs and a short torso.
How to Measure Your Inseam (The “Book” Method)
Your “cycling inseam” is different from your trouser length. To get this right:
- Stand against a flat wall in your cycling socks (or barefoot).
- Place a thick hardcover book between your legs, pulling it up firmly against your pelvic bone to mimic the pressure of a bike saddle.
- Ensure the book is level against the wall.
- Have a partner (or use a pencil) mark where the top of the book hits the wall.
- Measure from the floor to that mark in centimeters.
The Formula:
- Road Bike: Inseam (cm) x 0.67 = Your Frame Size.
- MTB: Inseam (cm) x 0.67 – 10cm (or roughly 2 inches smaller than a road frame).
Calculating Your Ape Index
This is the “secret sauce” of pro fitting. Your Ape Index is the relationship between your arm span and your height.
- Measure your arm span (fingertip to fingertip) and subtract your height.
- Positive Ape Index: Your arms are longer than your height. Action: Consider sizing up or using a longer stem.
- Negative Ape Index: Your height is greater than your arm span. Action: Sizing down or a shorter reach will prevent overstretching.
Measuring the Frame (The Three Critical Points)
When you look at a geometry chart, it can feel like reading a blueprint for a rocket. Focus on these three areas to understand how the bike will actually feel.
1. The Seat Tube (C-T vs. C-C)
This is the traditional way bikes are sized (e.g., a “54cm road bike”).
- Center-to-Top (C-T): Measure from the center of the Bottom Bracket (the bolt holding the crank arms) to the very top of the seat tube where the seat post enters.
- Center-to-Center (C-C): Measure from the center of the Bottom Bracket to the center of the junction where the top tube meets the seat tube.
Why it matters: Most modern brands use C-T, but vintage frames often use C-C. Always check which one you are measuring to avoid a 2cm discrepancy.
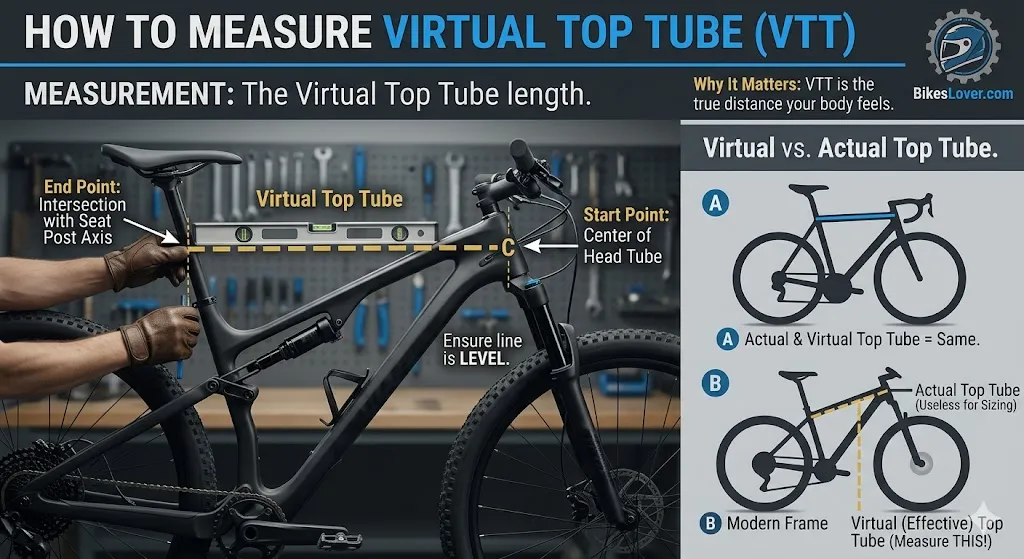
2. The Top Tube: Actual vs. Effective (Virtual)
On vintage bikes, the top tube was a horizontal bar. On modern MTBs and compact road bikes, the tube slopes downward.
- Actual Top Tube: The physical length of the tube itself. On a sloping frame, this number is useless for sizing.
- Effective (Virtual) Top Tube: Use your level app to create a perfectly horizontal line starting from the center of the Head Tube (where the handlebars connect) back to the Seat Post.
- The Edge: Measuring the “Virtual” length tells you how long the bike will feel when you are sitting in the saddle.
3. Reach and Stack: The Modern Standard
If you are buying a 2026 Mountain Bike or E-Bike, forget seat tube length. Look at Reach.
- Reach: The horizontal distance from the center of the bottom bracket to the center of the top of the head tube.
- Stack: The vertical distance from the center of the bottom bracket to the top of the head tube.
- Why it’s King: Reach tells you how much room your body has to move when you are standing on the pedals—the primary position for off-Road riding.
Bike-Specific Nuances (Comparison Table)
A “54cm” measurement does not mean the same thing across different disciplines. Use this table as a quick reference for how measurements translate between bike types.
| Feature | Road Bike (Performance) | Mountain Bike (Trail/Enduro) | Hybrid / E-Bike |
| Primary Metric | Seat Tube Length (cm) | Reach (mm) | Stand-over Height |
| Riding Position | Aerodynamic / Lean Forward | Upright / Dynamic | Relaxed / Vertical |
| Top Tube Style | Mostly Horizontal | Heavy Slope (Compact) | Variable / Step-through |
| Typical Size Range | 48cm – 62cm | S, M, L, XL | 15″ – 23″ |
| Bottom Bracket | Lower (for stability) | Higher (for clearance) | Medium |
Troubleshooting Your Fit (The “Defeat the Competitor” Section)
Sometimes the measurements look perfect on paper, but the ride feels “off.” Here is how to diagnose and fix fit issues based on physical feedback.
“My lower back hurts after 20 minutes.”
- Diagnosis: The Effective Top Tube is too long, causing you to overreach and “round” your spine.
- Fix: Swap for a shorter stem or move the saddle slightly forward (within the safety rails).
“My knees hit the handlebars when I turn.”
- Diagnosis: The Reach is too short for your torso/arm length.
- Fix: This is a frame-size issue. If you are between sizes, you should have sized up. You can mitigate this with a longer stem, but it will slow down your steering.
“I feel like I’m sliding forward off the saddle.”
- Diagnosis: Your Stack is too low, or your saddle tilt is incorrect.
- Fix: Add spacers under your stem to raise the handlebars, or check that your “Virtual Top Tube” measurement was level.
Pros & Cons of DIY Bike Measuring
Pros
- Save Money: Avoid the $200–$400 cost of a professional 3D retül fit.
- Market Independence: You can buy bikes online with confidence without needing to “test ride” every model.
- Mechanical Knowledge: Understanding your geometry helps you troubleshoot handling issues yourself.
Cons
- Human Error: A 1cm mistake in measuring your inseam can lead to buying the wrong frame size.
- Static vs. Dynamic: DIY measuring doesn’t account for how your body moves under load (pedaling hard).
- Tool Limitations: Without a laser-level, “Virtual Top Tube” measurements are always approximations.
FAQs
A: Always use centimeters (cm) for road and hybrid bikes. Mountain bikes are often sized in inches or Alpha sizing (S/M/L), but the technical geometry charts will almost always provide mm/cm for precision.
A: It is a safety requirement (you need at least 1–2 inches of clearance to protect yourself when hopping off the seat), but it is a poor indicator of how the bike will actually ride.
A: If you have a Positive Ape Index (long arms), size up. If you prefer a more “flickable,” aggressive ride, size down. Generally, it is easier to make a small bike feel bigger (longer seat post/stem) than to make a big bike feel smaller.
A: In fact, it’s more important on E-Bikes like those from Engwe or Ridstar, which often use “One-Size-Fits-Most” frames. You need to know the virtual length to see if the cockpit will be too cramped for your wingspan.
A: For children, the primary measurement is Wheel Size (12″, 16″, 20″, 24″), but the “Inseam Method” remains the best way to ensure their feet can touch the ground safely.
Final Expert Verdict
In 2026, the “Golden Age” of direct-to-consumer bike brands, being your own fit-expert is a superpower. By mastering the Virtual Top Tube and understanding your Ape Index, you move beyond the guesswork that plagues most amateur riders.
Don’t just trust the “Medium” sticker on the frame. Grab your tape measure, find your level, and confirm the geometry for yourself. A bike that fits like a glove isn’t just a luxury—it’s the difference between a ride that ends in pain and a ride that never wants to end.