
How are Bike Frames Measured? The Ultimate Masterclass in Bike Geometry
Finding the perfect How are bike frames measured fit goes far beyond simply standing over a frame and hoping it feels right. Many riders are confused when a 54 cm road bike feels too large, while a 19-inch mountain bike feels perfectly comfortable. This difference comes down to bike geometry, not just the number printed on the frame. The seat tube size, often marketed as the “official” size, only tells part of the story. In reality, measurements like Effective Top Tube length, Stack, and Reach have a far greater impact on how a bike fits your body. These dimensions determine your riding posture, weight distribution, and overall comfort. Without understanding them, it’s easy to end up with a bike that causes discomfort, inefficient pedaling, or even long-term strain on your back, knees, and wrists. That’s why relying solely on basic size labels can be misleading for both beginners and experienced riders.
In this in-depth masterclass for BikesLover.com, we go beyond the basics to reveal how bike sizing really works. You’ll learn how manufacturers calculate frame sizes, why different bike categories use different measurement systems, and how professional mechanics evaluate fit with precision. We break down the exact methods used to measure a bike frame, from seat tube length to advanced geometry metrics, along with the formulas that help translate your body measurements into the perfect size. You’ll also discover how to read a geometry chart like a pro, allowing you to compare different models and brands with confidence. Whether you’re choosing a high-performance road bike or a rugged mountain bike for off-road adventures, understanding these principles gives you complete control over your buying decision. With the right knowledge, you can achieve a perfect fit that enhances comfort, boosts performance, and prevents injuries over the long term.
The Traditional Metric: Seat Tube Length (C-C vs. C-T)
Historically, “bike size” referred almost exclusively to the length of the seat tube. In the days of classic frames—where the top tube was perfectly level—this was a reliable metric. However, even within this simple measurement, there are two distinct standards you must know.
Center-to-Center (C-C)
This is measured from the center of the bottom bracket (BB) spindle to the center of the junction where the top tube meets the seat tube. Many vintage European brands and high-end custom builders still prefer this because it focuses on the structural core of the bike’s triangle.
Center-to-Top (C-T)
This is measured from the center of the BB to the very top of the seat tube collar (where the seat post enters). Because seat tube collars vary in height, a 54cm C-T frame will often feel smaller than a 54cm C-C frame.
Pro Tip: Road bikes are traditionally measured in centimeters (cm), while Mountain Bikes (MTB) use inches (in) or generic labels like S, M, L, and XL. Always convert your measurements if you are switching categories!
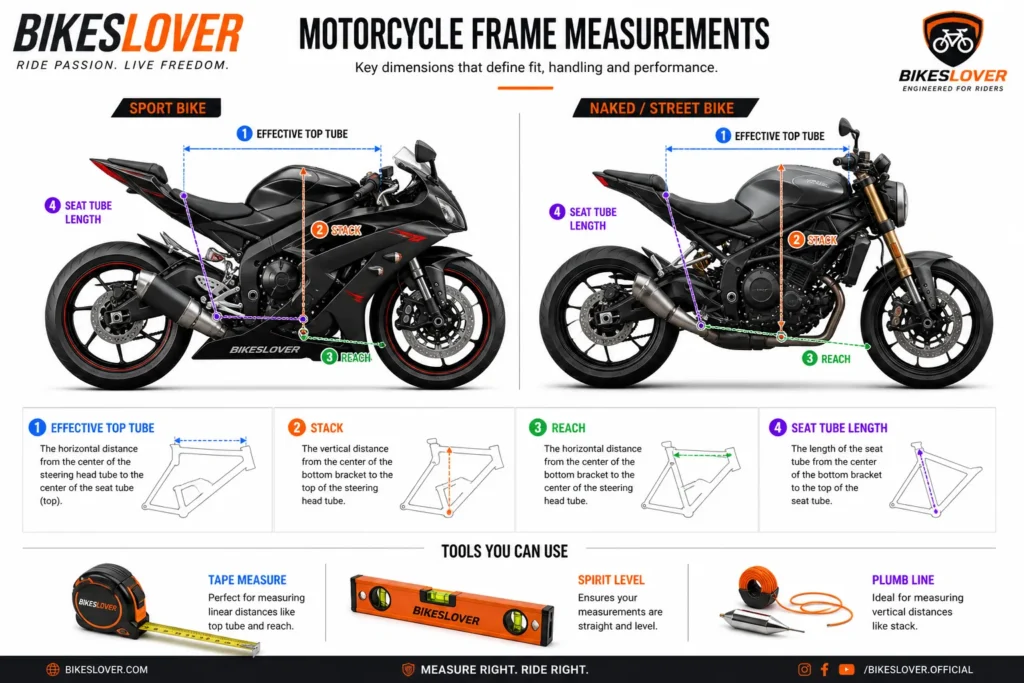
The Modern Standard: Effective Top Tube (ETT)
With the rise of “compact geometry”—where the top tube slopes downward toward the back—measuring the physical tube is no longer enough. This is where ETT comes in.
What is Effective Top Tube?
The Effective Top Tube (ETT) is the horizontal distance from the center of the head tube to the center of the seat post. Imagine a perfectly level line extending back from your handlebars to your seat; that is the ETT.
Why ETT Trumps Physical Length
- Consistency: It allows you to compare a classic bike with a level top tube to a modern carbon bike with a radical slope.
- Cockpit Comfort: It tells you exactly how far your torso will lean forward.
- The Spirit Level Secret: To measure this at home, you cannot simply use a tape measure. You must use a spirit level to ensure your measurement line is perfectly horizontal.
Stack and Reach: The Only Numbers That Truly Matter
If you want to compare two different brands—say, a Specialized and a Cannondale—you must ignore the “Size 56” label and look at Stack and Reach. These are the most objective measurements in the bike world.
| Metric | Definition | Impact on Ride |
| Stack | Vertical distance from the center of the BB to the top center of the head tube. | Determines how “upright” or “aggressive” your posture is. Higher stack = more comfort. |
| Reach | Horizontal distance from the center of the BB to the top center of the head tube. | Determines how far you have to “stretch” to reach the bars. |
Why Pros Use Stack and Reach
Because the Bottom Bracket is the only fixed point on a bike (where your feet are), Stack and Reach tell you exactly where your hands will be in relation to your feet. If two bikes have the same Stack and Reach, they will fit identically, regardless of frame shape.
How to Measure Your Bike at Home: Step-by-Step
To get professional-grade results, don’t just “eyeball” it. You’ll need a metric tape measure, a spirit level, and a plumb line (a string with a weight tied to the end).
Step 1: Measure the Nominal Seat Tube Size
Place the end of your tape measure at the center of the crank bolt (BB). Measure up along the seat tube to the top. This is the size usually listed on the frame sticker.
Step 2: Measure Standover Height
Leaning the bike against a wall, stand over the top tube with your feet flat. Use your spirit level to measure from the floor to the top of the tube.
- Road Bikes: You need 2.5cm – 5cm (1–2 inches) of clearance.
- MTBs/Dirt Bikes: You need 7.5cm – 10cm (3–4 inches) for safety during sudden dismounts.
Step 3: Calculate the Reach
Drop your plumb line from the center of the head tube. Use your tape measure to find the horizontal distance from the string back to the center of your Bottom Bracket.
Road vs. Mountain Bike: Different Worlds, Different Math
Don’t make the mistake of using the same logic for both styles.
- Road Bikes: Focused on aerodynamics. Sizing is precise (52, 54, 56cm). A 1cm difference significantly changes the handling and your back comfort.
- Mountain Bikes: Focused on stability. Modern MTBs use “Long, Slack, and Low” geometry. Here, the Reach is much more important than the seat tube length because you spend so much time standing on the pedals.
Pros and Cons of Common Measuring Methods
| Method | Pros | Cons |
| Seat Tube Length | Easy to measure; common starting point. | Misleading on modern sloping bike frames. |
| Effective Top Tube | Best for torso comfort/stretch. | Hard to measure without a spirit level. |
| Stack & Reach | The gold standard for pro fitting. | Requires more technical effort to measure. |
| Standover Height | Essential for safety and “clearance.” | Doesn’t tell you how the bike handles. |
The “Ape Index” and Final Adjustments
If you are exactly between two sizes, check your Ape Index.
- The Formula: Arm Span minus Height.
- Positive Ape Index: Your arms are longer than your height. Go for the larger frame.
- Negative Ape Index: Your arms are shorter than your height. Choose the smaller frame to avoid over-stretching.
Conclusion
At BikesLover.com, we believe that a correctly measured bike is one that truly gets ridden—and enjoyed. Too often, riders focus only on frame size labels like small, medium, or large, but overlook the geometry that actually determines comfort and performance. Measurements such as Effective Top Tube, Stack, and Reach play a far more important role in how a bike fits your body. When these elements are dialed in properly, your riding posture becomes natural, your power transfer improves, and long rides feel significantly less tiring. On the other hand, incorrect measurements can lead to persistent issues like lower back pain, knee strain, and numb hands—problems that not only ruin the riding experience but can also discourage consistency. A well-fitted bike eliminates these barriers and turns every ride into something smooth, efficient, and enjoyable.
By Mastering key geometry concepts like Effective Top Tube, Stack, and Reach, you gain the confidence to choose the right bike—even when buying online. You’re no longer guessing based on frame size charts alone; instead, you’re making informed decisions based on how a bike will actually fit and perform for your body type and riding style. This knowledge empowers you to compare different brands, models, and designs with clarity, ensuring you invest in a bike that feels right from day one. Whether you’re a casual commuter, weekend explorer, or performance-focused rider, proper measurements are the foundation of a great cycling experience. In 2026 and beyond, smarter riders are prioritizing fit over hype—and that’s exactly how you ride longer, stronger, and pain-free.
FAQs
A: Yes, by swapping the stem. However, changing it by more than 20mm can make the steering feel “twitchy” or slow.
A: No. Frame size is the chassis. Wheel size (e.g., 29er, 700c) is the rim diameter. You can have a small frame with big wheels.
A: Kids’ bikes are usually categorized by wheel size (12″, 16″, 20″), but always check the standover height so they can touch the ground safely.
A: It’s a way to simplify sizing across different frame styles, but you should still check the geometry chart’s Stack and Reach to be sure.
A: No, the frame is fixed. Saddle height is an adjustment you make to the frame to fit your leg length.