Mountain Bike Dropper Post Guide 2026
The Mountain bike dropper post pushed harder than ever before. A full ten years back, things looked different – simpler. Control matters more now, not just power or pace. Speed still counts, yet staying balanced on rocky drops weighs heavily in riders’ minds. Instead of holding steady, bodies shift constantly through jagged descents. The gear that changed how people ride? That would be the seat tube you lower mid-run. Handling sharp turns improved once seats began moving up and down at will.
One moment you’re climbing, the next you need to drop low – this seatpost shifts on the fly. Riders change saddle height without stopping, thanks to a lever near the handlebars. Not just convenience – it reshapes how you move through rough terrain. Steep drops feel less risky when your center of gravity sinks fast. What looks like a small part plays a big role mid-ride. Going uphill? Raise it quietly. Descending? Lower it instantly. Trail rhythm improves because adjustments happen in seconds. No more awkward stops to tweak your position manually. It works silently inside the frame, out of sight but never forgotten. Slight hardware, major effect – that’s the reality most notice after trying one.
Jump into this full look at dropper posts from 2026 – discover how they work, what drives them, and ways to match one to your ride habits. Peek under the hood with care advice, frequent hiccups, plus fixes tucked in. Ride cross country? Hit trails? Push limits on enduro runs? Spend tight? Options exist for each path. Details unfold across every twist.
Ahead lies everything needed to pick a dropper post that lifts how you ride trails, plus deepens the joy of every outing. What matters most comes clear when setup meets motion.
Table of Contents
- What Is a Mountain Bike Dropper Post?
- Why Dropper Posts Matter
- How Mountain Bike Dropper Posts Work
- Cable‑Actuated
- Hydraulic
- Electronic / Wireless
- Key Advantages of Using a Dropper Post
- Selecting the Appropriate Dropper Post
- Travel Length
- Post Diameter and Frame Compatibility
- Actuation and Remote Lever Choices
- Best Dropper Posts by Riding Style
- How to Install a Dropper Post
- Maintenance Guide – Keeping It Functional
- Common Dropper Post Problems and Solutions
- FAQs
- CTA – Your Next Steps
What Is a Mountain Bike Dropper Post?
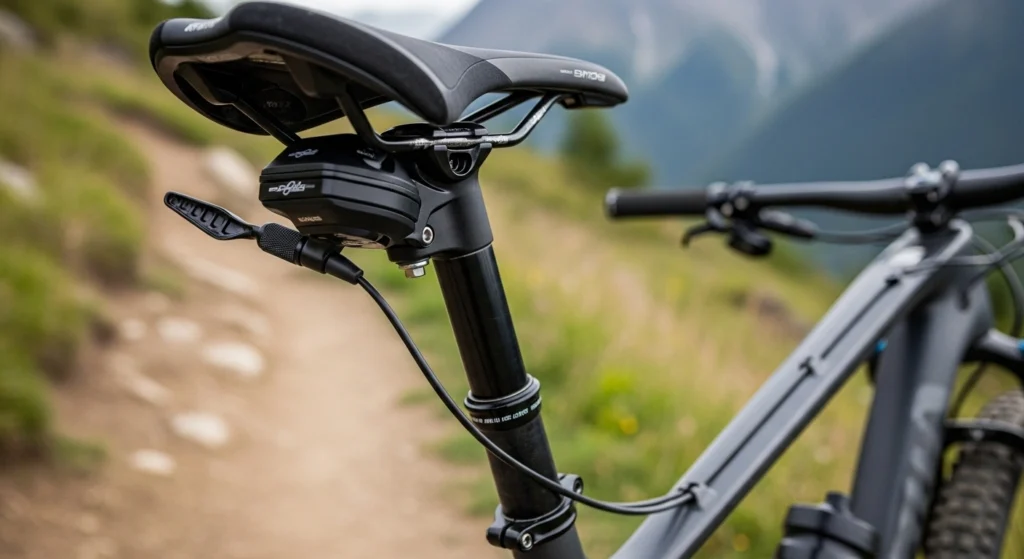
Downhill turns easier when the saddle gets out of the way. That shift happens on the fly, thanks to a control built into the frame or handlebars. Instead of staying fixed like regular posts, this one slides up and then drops low whenever needed. Riding rough terrain becomes smoother because your center changes mid-run. When the trail points upward again, the seat glides back where pedaling feels right.
Picture sitting in your desk chair, changing its height without standing up – that smooth shift is what a dropper post brings to mountain bikes. Pressing a small lever on the handlebars raises or lowers the saddle right away. This lets you adapt quickly when the trail changes shape beneath you.
When the trail gets rough, staying balanced matters most. How you steer the bike shapes how well it responds. Control slips fast if your posture wobbles. Stability ties into every move you make out there. Poor positioning risks both safety and precision when the terrain turns tricky.
Why Dropper Posts Matter
Benefits Riders Experience Instantly
Dropper posts have become indispensable for modern mountain bikers. Here’s why:
- Lower Center of Gravity: By dropping the saddle, you shift your weight backwards, which enhances stability on steep or rocky descents.
- Enhanced Bike Control: The ability to quickly adjust saddle height improves balance and traction over technical features.
- Time-Saving Adjustments: Change height without stopping, maintaining speed and flow on trails.
- Confidence Boost: Riding becomes safer and more predictable when your body positioning is optimized for the terrain.
- Climbing Efficiency: Raising the saddle during climbs ensures your pedaling biomechanics are ideal, reducing fatigue and improving endurance.
For many riders, a dropper post represents the difference between a comfortable, controlled ride and a precarious, nerve-wracking one.
How Mountain Bike Dropper Posts Work
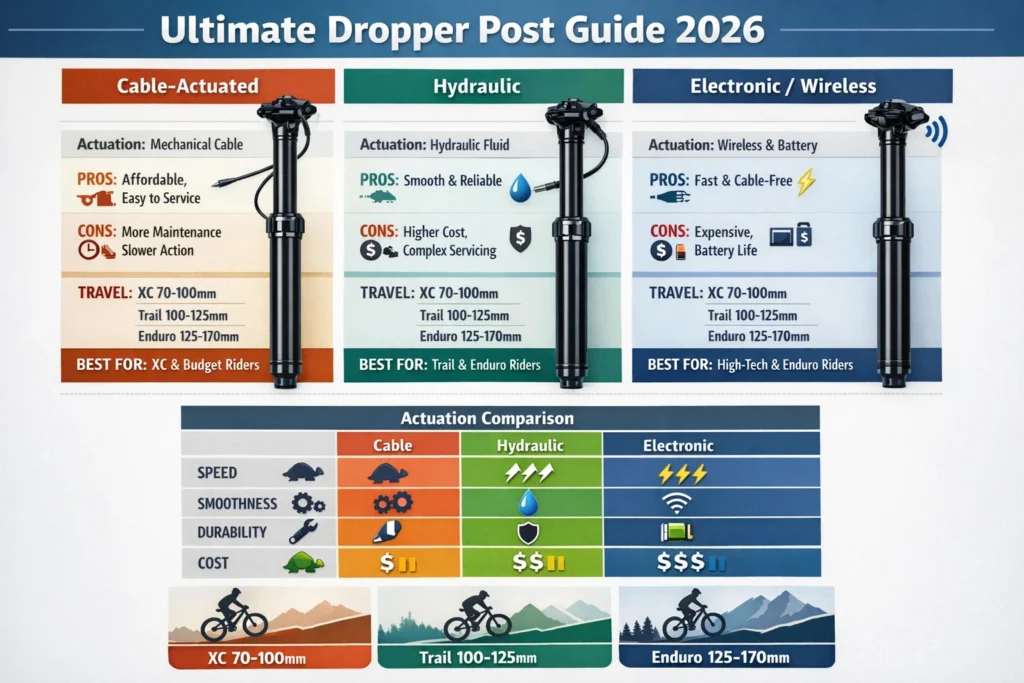
While all dropper posts serve the same purpose—altering saddle height on the go—the mechanisms that power them vary. There are three primary actuation systems:
Cable‑Actuated Dropper Posts
Mechanism:
A cable connects a handlebar lever to the dropper post. Pressing the lever pulls or releases the cable, activating the seatpost.
Pros:
- Affordable compared to other systems
- Simple to maintain or repair
- Compatible with standard cable routing setups
Cons:
- Action may feel less smooth than hydraulic posts
- Cables can stretch over time, affecting performance
Hydraulic Dropper Posts
Mechanism:
These posts use hydraulic fluid to move the seatpost. A lever pushes fluid through the system, enabling smooth and responsive adjustments.
Pros:
- Exceptionally smooth movement
- Rapid and precise actuation
- Reliable under heavy use
Cons:
- Higher initial cost
- Requires periodic bleeding and maintenance
Electronic / Wireless Dropper Posts
Mechanism:
Powered by a battery and electric motor, these posts operate without cables or hydraulic fluid. The lever triggers the motor to move the seatpost.
Pros:
- Extremely fast and smooth operation
- Clean installation with minimal components
- Minimal mechanical wear
Cons:
- Most expensive option
- Requires battery management and occasional charging
Actuation Comparison at a Glance
| Type | Smoothness | Cost | Maintenance | Responsiveness |
| Cable | Good | Low | Easy | Medium |
| Hydraulic | Very Good | Medium-High | Medium | High |
| Electronic | Excellent | High | Battery Care | Very High |
Key Advantages of Using a Dropper Post
Dropper posts do more than just facilitate saddle adjustments—they actively enhance your riding safety, performance, and comfort.
- Improved Trail Control
Lowering the saddle allows your body to shift backward, improving balance, traction, and confidence on steep or rocky terrain. - More Efficient Climbing
Raising the saddle to optimal height allows full leg extension, improving pedaling efficiency and reducing energy expenditure. - Time-Saving Adjustments
Avoid frequent stops—keep your momentum and maintain flow, saving time and energy on the trail. - Enhanced Confidence
Proper body positioning keeps you stable and secure, even on challenging descents. - Reduced Fatigue
By adapting your saddle height to terrain on the fly, you reduce strain on knees and hips, prolonging ride endurance.
Selecting the Appropriate Dropper Post
Selecting the right dropper post involves more than price—it requires alignment with your riding style, frame, and preferences.
Travel Length
Travel refers to how far the seatpost can drop. Different riding styles benefit from different travel ranges:
| Riding Style | Travel Range | Why It Works |
| XC (Cross Country) | 70–100mm | Lightweight, efficient pedaling |
| Trail | 100–125mm | Versatile for mixed riding |
| Enduro / Downhill | 125–170mm | Maximum drop for steep descents |
Example: XC riders who mostly pedal on smooth trails may prefer a 70–100mm drop for efficiency. Enduro riders tackling technical, steep trails require 125mm+ travel for control and confidence.
Post Diameter & Frame Compatibility
Finding the right Dropper post means matching its width to what your bike frame needs. Look up your frame details before deciding – size matters here. Some fit wide tubes, others need something narrow.
Always cross-check measurements; guessing can cause problems later
- Lighter bikes often pair better with 27.2mm seatposts – older models tend to match this size too
- A bit under 31 millimeters wide. Common across today’s bicycles by default
- A quarter-inch thick, this one handles hard hits without buckling.
- Tough enough for fast runs where control matters most
Also, determine if your bike has internal or external routing:
- Inside paths take shape with less clutter.
- Yet fitting them demands extra care.
- Out in the open, wires take a straightforward path during setup – yet they show more than hidden ones.
- Appearance pays a small price for simpler mounting
Remote Lever Options
The type of lever can affect comfort and precision:
- Thumb Lever: Standard, precise control
- Under-bar Lever: Ergonomic, easy to reach
- Two-finger Lever: Ideal for large hands
Choose the lever that feels most natural on your grips for consistent, smooth operation.
Best Dropper Posts by Riding Style
Here’s a concise breakdown of optimal posts for different categories of riders:
Trail Riders
| Feature | Ideal | Example |
| Travel | 100–125mm | Smooth mid-drop |
| Actuation | Hydraulic or Cable | Balanced performance |
| Weight | Medium | Reliable handling |
Enduro & Downhill Riders
| Feature | Ideal | Example |
| Travel | 125–170mm | Steep terrain |
| Actuation | Hydraulic | Fast, smooth operation |
| Durability | High | Heavy-duty post |
XC Riders
| Feature | Ideal | Example |
| Travel | 70–100mm | Lightweight |
| Actuation | Cable or Electronic | Efficient & light |
Budget Riders
| Feature | Ideal | Example |
| Travel | 100–125mm | All-around utility |
| Actuation | Cable | Affordable, easy maintenance |
How to Install a Dropper Post
While a bike shop can install your post, it’s possible at home:
- Check Frame Compatibility – Confirm diameter and travel fit.
- Prepare Seat Tube – Clean and lightly grease (cable posts).
- Route Cable/Hose – Internal routing requires threading; external is simpler.
- Insert Dropper Post – Slide gently into the seat tube.
- Clamp Seatpost – Torque per manufacturer’s instructions.
- Install Remote Lever – Position for ergonomic access.
- Test Function – Ensure smooth up/down travel.
Maintenance Guide – Keeping It Functional
Regular care keeps your dropper post smooth and reliable:
Cable-Actuated:
- Clean cable & housing
- Lubricate lightly
- Check tension monthly
Hydraulic:
- Inspect for smooth operation
- Bleed system every 6 months
Electronic:
- Charge battery
- Inspect connections
Seasonal Tips:
- Rinse mud carefully; avoid direct spray on seals
- Dry post after wet rides
Annual Checkup:
- Even top posts benefit from professional servicing once a year.
Common Dropper Post Issues & Fixes
| Problem | Cause | Solution |
| Post slow/sticky | Low air/hydraulic pressure | Bleed system or add air |
| Lever loose | Cable stretch | Adjust or replace |
| Post won’t drop | Dirt or wear | Clean or service |
| Noise | Lack of lubrication | Grease bushings |
Pro Tips:
- Sticky posts may improve after cleaning the stanchion and light lubrication.
- Jumpy behavior often stems from lever tension or cable adjustment.
FAQ
A: Absolutely. They enhance handling, confidence, and control, making them essential for serious riders.
A: Depends on riding style:
XC: 70–100mm
Trail: 100–125mm
Enduro/DH: 125–170mm
A: Most modern frames support them. Always check diameter, seat tube length, and routing type.
A: Cable posts: 6–12 months
Hydraulic posts: every 6 months or ~100 rides
A: Adjust travel, switch lever type, or change actuation system if frame allows.
Final Verdict
You now have a comprehensive understanding of mountain bike dropper posts: functionality, importance, selection, and maintenance.
Time to choose your post:
- Identify riding style (XC, Trail, Enduro)
- Set your budget
- Check bike compatibility
Use this guide’s tables to match the ideal dropper post. Unsure? Visit your local bike shop for a test ride.
Your next trail adventure will feel smoother, faster, and more controlled with the perfect dropper post!