Electric Bike Repair Guide
Electric bike repair Europe, electric bikes roll quietly alongside regular traffic, blending pedal power with a hidden motor hum. Trails stretching through parts of Asia and the U.S. see these bikes climbing hills without breaking a sweat. Instead of just muscle, riders rely on battery-fed support that kicks in when needed. What was once basic cycling now carries a smart assist, making longer commutes feel lighter. Wheels spin much like old-fashioned ones, yet something underneath gives an extra push. Movement feels familiar, only smoother, especially uphill or against the wind. In busy areas, they slip between cars that are stalled. Even quiet paths welcome them, thanks to near-silent motors. Not quite walking, not quite driving – this ride sits somewhere in between. A shift has happened, slow but steady, changing how people cover ground.
Sometimes things break when machines meet circuits – e-bikes are no different. Jump into this full walkthrough from 2026, built for real riders facing real hiccups. Start with battery checks, then move through motor quirks, controller gremlins, and wire tangles. Fix it yourself, avoid costly visits, and stretch time between service stops. Prevention slips in quietly – not always loud warnings before failure. Tools help – but knowing when to step back matters just as much. New to pedals? Rode for years? Either way, smoother rides start here. Costs add up fast if ignored; catch issues early, save later. Your bike stays ready only if small flaws never get comfortable.
What is Electric Bike Repair?
Faults in electric bikes need fixing, spotting issues before they grow. These rides carry parts regular cycles lack – extra bits demanding unique care. Problems might live in wires, motors, wheels, or hidden inside frames. Mechanics often check the power flow when lights flicker or stop working. A glitch could hide in sensors that react when you pedal. Battery troubles show up as short trips between charges. Some fixes mean swapping cables frayed by weather and time. Others involve tuning how fast the motor kicks in. Tools differ from those used on old-style bikes. Grease matters less here; software updates matter more. Each model asks for different steps to diagnose what is wrong. Mistakes happen if someone treats it like a normal bicycle.
- Battery pack
- Electric motor
- Electronic controller
- Sensors and switches
- Wiring harnesses
- Digital displays and consoles
If a piece inside breaks, the whole electric bike might stop working properly. Fixes usually fit into just three types.
How Electric Bikes Function (Quick Overview)
Understanding the primary components and systems of your e-bike is crucial to effective troubleshooting. Most e-bikes rely on five essential subsystems:
| Component | Function |
| Battery | Stores electrical energy for propulsion |
| Motor | Converts electricity into mechanical motion |
| Controller | Regulates power distribution and motor output |
| Sensors | Detect pedaling effort, torque, and speed |
| Drivetrain | Transfers energy from the motor and pedals to the wheels |
Battery
The battery is often considered the core of an e-bike. Most contemporary models use lithium-ion cells, renowned for high energy density, light weight, and longevity. Typical capacities range from 300Wh to 800Wh, directly influencing the bike’s range and performance.
Motor
The motor supplies pedal assistance or throttle-driven propulsion. Two prevalent designs are:
- Hub motors: Located in the wheel hub; generally simpler and easier to maintain.
- Mid-drive motors: Positioned near the crankset; deliver efficient torque but are more intricate to service.
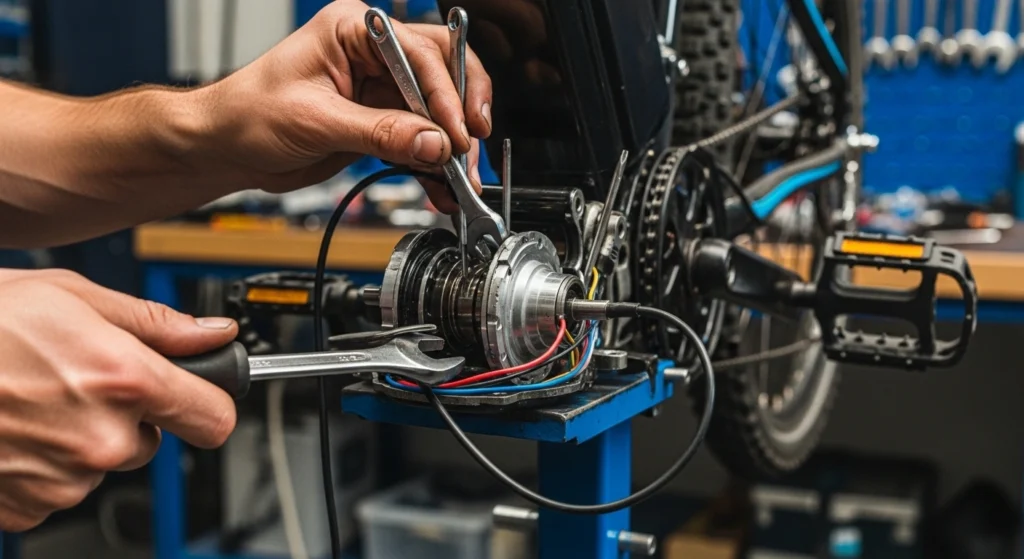
Controller
The controller functions as the brain of the e-bike, regulating power flow, speed limits, motor responsiveness, and safety cutoffs.
Sensors
Sensors detect rider input and environmental conditions:
- Pedal Assist Sensor (PAS) – tracks pedaling cadence
- Torque Sensor – monitors pedal force
- Speed Sensor – tracks wheel rotation
Drivetrain
The drivetrain encompasses the chain, cassette, crankset, and derailleur, transferring combined rider and motor power to the wheels. High motor torque can accelerate drivetrain wear, making routine inspection essential.
Typical Electric Bike Problems and Solutions
E-bikes are subject to both mechanical wear-and-tear and electronic malfunctions. Understanding these issues helps you diagnose problems swiftly and accurately.
1. Battery Problems
Common symptoms:
- The battery fails to charge
- Reduced range or performance
- Sudden power loss
- Display shuts off intermittently.
Potential causes:
- Aging lithium-ion cells
- Lose or corroded battery connectors
- Faulty or incompatible charger
- Battery management system (BMS) failure
Quick fixes:
- Test the charger and the power outlet
- Inspect battery terminals and clean with isopropyl alcohol.
- Check and secure connections.
- Restart the system
Replacement tip: Batteries typically last 500–1000 charge cycles, and if capacity drops below 70%, replacement is recommended.
2. Motor Issues
Signs of motor malfunction:
- Motor does not engage
- Grinding or unusual noises
- Reduced torque or speed
- Overheating
Potential causes:
- Loose or damaged wiring
- Controller faults
- Water intrusion
- Internal motor wear
Repair workflow:
- Examine motor cables and connectors
- Inspect the controller for errors or damage.
- Reset the e-bike system.m
- Replace worn motor components
Note: Hub motors are easier to service than mid-drive units, which often require professional attention.
3. Brake Problems
Typical issues:
- Worn or contaminated brake pads
- Squealing brakes
- Reduced stopping power
- Hydraulic fluid leaks
Solutions:
- Replace or clean brake pads
- Clean rotors with isopropyl alcohol
- Adjust calipers and le. ver.s
- Bleed hydraulic lines when necessary.
Step-by-Step Electric Bike Troubleshooting
Before investing in expensive replacements, follow a systematic troubleshooting approach:
| Step | Action | Checkpoints |
| 1 | Verify battery charge | Ensure full charge and correct voltage |
| 2 | Inspect connectors | Tighten loose or corroded terminals |
| 3 | Restart system | Reset the controller and display |
| 4 | Review error codes | Note any diagnostic alerts |
| 5 | Test motor performance | Pedal assist and throttle response |
| 6 | Examine drivetrain | Inspect chain, gears, and brakes |
Effectiveness: This workflow can resolve over 60% of common e-bike problems without professional intervention.
Electric Bike Battery Repair and Maintenance
A single spark might release what these cells hold. Care steps matter most when fixing them.
- Steps for battery maintenance:
- Inspect housing – Check for cracks, water ingress, or physical damage
Start by wiping down the terminals. A bit of rubbing alcohol on a gentle fabric works well. This helps electricity flow properly. Finish with a dry touch to remove any moisture left behind.
- Start by checking the voltage – use a multimeter to spot weak battery cells before they fail.
- Check the charger. Swap it out when broken
- Replace battery pack – When capacity falls below 70%
A good move? Keep batteries away from cold or blazing heat. Skip letting them drain completely, too – doing that often shortens how long they last.
Motor Repair Guidelines
Hub Motors
- Replace worn bearings or gears
- Tighten axle nuts
- Repair internal wiring
Mid-Drive Motors
- Replace internal gear sets if worn.
- Calibrate torque sensors
- Update firmware as recommended.
Note: Many mid-drive repairs are better handled professionally due to complexity.
Controller and Wiring Repair
The controller coordinates the entire e-bike electrical system.
Controller failure symptoms: The bike fails to power on
- Motor power fluctuates
- Error codes appear
Repair checklist:
- Inspect connectors and plugs
- Check the wiring harness for cuts or frays.
- Test voltage outputs
- Replace controller if needed ($100–$300)
DIY Electric Bike Maintenance Checklist
Routine preventive maintenance prevents major component failure.
| Task | Frequency |
| Inspect brake pads | Monthly |
| Check tire pressure | Weekly |
| Lubricate chain | Every 200 miles |
| Inspect wiring | Monthly |
| Tighten bolts | Monthly |
| Clean drivetrain | Monthly |
Consistency: Following this checklist reduces repair costs and extends the bike’s lifespan.
Essential Electric Bike Repair Toolkit
Tools every DIY rider should have:
- Allen key set
- Torque wrench
- Tire levers
- Chain lubricant
- Cable cutters
- Screwdrivers
- Multimeter (critical for electrical testing)
Electric Bike Repair Costs
Costs vary depending on component, brand, and labor required.
| Repair Type | Average Cost |
| Battery replacement | $300–$800 |
| Motor repair | $200–$600 |
| Controller replacement | $100–$300 |
| Brake pad replacement | $30–$100 |
| Tire replacement | $20–$80 |
Note: Premium e-bikes often have proprietary parts, raising repair costs.

DIY vs Professional Electric Bike Repair
| Factor | DIY Repair | Professional Repair |
| Cost | Lower | Higher |
| Skill Required | Moderate | Minimal |
| Risk | Possible mistakes | Lower |
| Speed | Depends on experience | Typically faster |
DIY is best for:
- Brake adjustments
- Tire replacements
- Chain and drivetrain upkeep
- Minor electrical inspections
Professional service is recommended for:
- Motor replacement
- Battery rebuilds
- Controller troubleshooting
- Firmware updates
When to Repair vs Replace an E-Bike
Repair if:
- The frame is structurally sound
- Battery retains charge
- Repair costs <50% of the bike’s market value
Replace if:
- The frame is compromised
- Multiple electronic systems fail
- The repair cost exceeds the bike’s worth
Electric Bike Maintenance Tips
Proper maintenance can double the lifespan of your e-bike.
- Store batteries at 10–25°C (50–77°F)
- Keep the bike and components clean and dry
- Recharge the battery at 20–30% to avoid deep discharge
- Regularly inspect cables and connectors
- Maintain proper tire pressure for efficiency and battery range
Electric Bike Repair Safety Tips
Start carefully when working with power cells or gadgets. Always move slowly around devices that store energy.
- Remove the battery before repairs
- Avoid water near electrical systems
- Use manufacturer-approved chargers
- Wear gloves when handling wiring
- Follow torque specs for bolts
Mistakes with safety steps can lead to sparks or harm inside the power unit.
Pros & Cons
Pros:
- Cost savings
- Builds mechanical knowledge
- Quick minor repairs
- Greater maintenance control
Cons:
- Requires tools and know-how
- Risk of improper repair
- Potential warranty void
- Complex electrical repairs can be challenging
FAQ
A: Every 500–1000 miles or at least once per year.
A: Yes, basic tasks like adjusting brakes, fixing tires, and checking simple wiring are DIY-friendly.
A: Battery degradation and loose electrical connections.
A: Typically 3–5 years or around 500–1000 charge cycles, depending on usage and care.
A: Routine maintenance is inexpensive, but battery replacement is usually the most costly repair.
Final Thoughts
Wheels spin just fine when pedals meet power. Fixing parts yourself? That keeps money in your pocket while helping things last longer. Start small – check wires, then nuts and bolts; doing so adds serious mileage between shop visits. Riding for years without hiccups means charging right, storing smart, plus going over systems before problems grow. A little time each month smooths out rough patches down the road.
A technician handles tough fixes best – think motor swaps, glitchy controllers, or putting batteries back together. Safety leans toward pros when jobs get complicated. A home toolkit gains new purpose when paired with these clear fixes, steady checkups keep problems away, while smart precautions make every ride safer.