
How Do You Measure a Bike Frame for Size
Introduction
Choosing the right How do you measure a bike frame for size is one of the most important decisions any rider can make. Whether you’re a beginner buying your first bicycle or an experienced cyclist upgrading your ride, understanding how to measure a bike frame for size can save you from discomfort, poor performance, and even long-term injuries.
A bike that’s too small can feel cramped and unstable, while one that’s too large may cause strain on your back, shoulders, and knees. Unfortunately, many riders rely only on height charts or guesswork—leading to costly mistakes.
This complete 2026 guide will walk you through everything you need to know—from quick measurements to advanced sizing techniques used by professionals. You’ll learn step-by-step methods, formulas, real-world examples, and expert tips to ensure a perfect fit every time.
How to Measure a Bike Frame in 30 Seconds
If you’re in a hurry, here’s the simplest method:
Measure from the center of the bottom bracket (where the pedals attach)
To the top of the seat tube
This measurement = bike frame size
- Road bikes: measured in centimeters (cm)
- Mountain bikes: measured in inches
Example:
- 54 cm (road bike)
- 17 inches (mountain bike)
Why Bike Frame Size Matters
Getting the correct frame size isn’t just about comfort—it directly affects your riding experience.
Key Benefits of Proper Bike Sizing
- Improved pedaling efficiency
- Better control and handling
- Reduced fatigue on long rides
- Lower risk of injury
- Enhanced overall performance
Risks of Wrong Size
- Knee pain and back strain
- Poor posture
- Reduced power output
- Unsafe riding position
In short: The right frame size = better riding + better health
Tools You Need to Measure a Bike Frame
Before you start, gather these simple tools:
| Tool | Purpose |
| Tape measure | Accurate measurement |
| Spirit level (optional) | Ensures straight measurement |
| Wall or flat surface | For stability |
| Smartphone | Measuring apps (optional) |
Step-by-Step: How to Measure a Bike Frame
This is the most important section—follow it carefully.
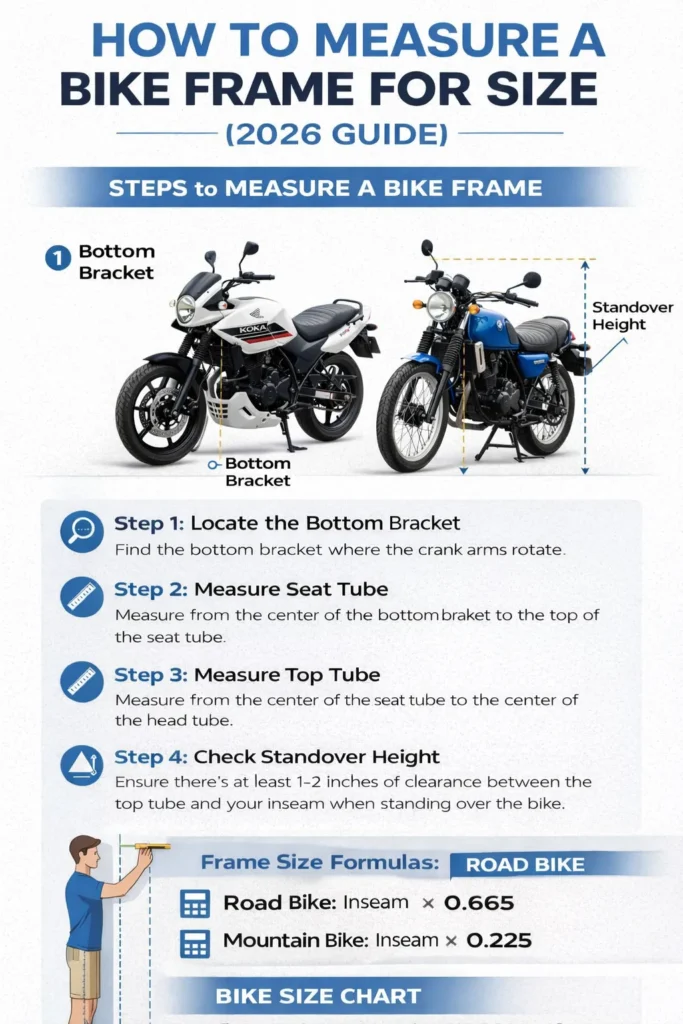
Step 1: Locate the Bottom Bracket
The bottom bracket is the center point of your bike:
- Found between the pedals
- Where crank arms rotate
This is your starting point
Step 2: Measure Seat Tube Length (Main Measurement)
This is the official bike frame size.
How to do it:
- Place tape at the center of the ottom bracket
- Measure straight up
- Stop at the top of the sheet tube
This gives you the frame size
Example:
- 54 cm = Medium road bike
- 17 inches = Medium MTB
Step 3: Measure Top Tube Length
The top tube affects your reach and comfort.
How to measure:
- Measure horizontally from:
- Seat tube → Head tube
Important for:
- Riding posture
- Handlebar reach
Step 4: Measure Standover Height
This determines safety and comfort.
Steps:
- Stand over the bike
- Check clearance between frame & body
Ideal clearance:
- Road bikes: 1–2 inches
- Mountain bikes: 2–4 inches
How to Measure Yourself for the Right Bike Size
Knowing your body measurements is just as important as measuring the bike.
Inseam Measurement (Most Important)
Steps:
- Stand against a wall barefoot
- Place a book between your legs
- Measure from floor → top of book
This = your inseam length
Height vs Inseam
Many beginners rely only on height—but that’s not accurate.
Two riders of the same height can have different leg lengths
Always prioritize inseam measurement
Bike Frame Size Formulas (Pro Level Accuracy)
These formulas help estimate ideal frame size.
Road Bike Formula
Inseam (cm) × 0.665 = Frame size (cm)
Example:
- Inseam: 80 cm
- 80 × 0.665 = 53.2 cm
Choose: 53–54 cm frame
Mountain Bike Formula
Inseam (cm) × 0.225 = Frame size (inches)
Example:
- Inseam: 80 cm
- 80 × 0.225 = 18 inches
Hybrid Bike Formula
Inseam (cm) × 0.685 = Frame size (cm)
Bike Frame Size Chart (Height vs Frame Size)
Here’s a quick reference chart:
| Rider Height | Road Bike (cm) | Mountain Bike (inches) | Hybrid (cm) |
| 5’0”–5’3” | 50–52 | 13–15 | 48–50 |
| 5’3”–5’6” | 52–54 | 15–16 | 50–52 |
| 5’6”–5’9” | 54–56 | 16–17 | 52–54 |
| 5’9”–6’0” | 56–58 | 17–18 | 54–56 |
| 6’0”–6’3” | 58–60 | 18–19 | 56–58 |
| 6’3”–6’6” | 60–62 | 19–21 | 58–60 |
Use this as a starting point—not a final decision
Road Bike vs Mountain Bike Sizing Differences
Understanding sizing differences is crucial.
| Feature | Road Bike | Mountain Bike |
| Units | Centimeters | Inches |
| Frame size | Larger | Smaller |
| Riding posture | Aggressive | Upright |
| Clearance | Lower | Higher |
| Usage | Speed | Control |
Understanding Bike Geometry (Advanced Section)
Most competitors confuse users here—but we’ll simplify it.
Key Geometry Terms
Reach
Distance from saddle to handlebars
Stack
Vertical height of frame
Wheelbase
Distance between wheels
These affect comfort more than size alone
Common Mistakes to Avoid
Avoid these costly errors:
Using height only
Height is not enough—inseam matters more
Ignoring bike type
Road and MTB sizing are different
Assuming universal sizing
Each brand uses different geometry
Not checking the standover height
Can lead to safety issues
Buying without testing
Always test ride if possible
Pro Tips for Perfect Bike Fit
Here’s what experts recommend:
Choose a smaller frame for control
Better handling, especially off-road
Choose a larger frame for comfort
Ideal for long-distance rides
Adjust the seat height properly
The leg should be slightly bent at the bottom
Check handlebar reach
Avoid over-stretching
Use a professional bike fitting
Best for serious riders
Step-by-Step Process Summary Table
| Step | Action | Outcome |
| 1 | Measure inseam | Know your body size |
| 2 | Measure the seat tube | Get frame size |
| 3 | Check the top tube | Ensure comfort |
| 4 | Verify standover | Safety check |
| 5 | Use a chart/formula | Confirm size |
Pros & Cons
Pros
- Saves money
- Quick and easy
- No special tools required
- Helps with online bike buying
Cons
- Less accurate than a professional fitting
- Requires careful measurement
- Brand variations can confuse
Global Sizing Differences (Important for International Buyers)
Bike sizing can vary by region:
🇪🇺 Europe
- Mostly uses centimeters
- Precise geometry standards
🇺🇸 USA
- Uses inches (MTB) and cm (road bikes)
🇯🇵 Japan
- Smaller frame sizing trends
🇵🇰 / 🇮🇳 Asia
- Mixed sizing systems
- Often labeled S, M, L instead
Always check the manufacturer’s sizing chart
How to Choose the Right Size When Buying Online
Buying online? Follow this:
- Measure inseam accurately
- Use a random-specific chart
- Compare geometry
- Read user reviews
- Choose between two sizes wisely
Tip:
If between sizes →
- Go smaller for agility
- Go bigger for comfort
FAQs
A: Using the inseam-based formula + seat tube measurement
A: But accuracy will decrease. A tape measure is highly recommended.
A: Each brand uses different geometry and sizing standards.
A: You may experience discomfort, poor performance, and possible injury.
A: Inseam is the most accurate measuremen.
Final Thoughts
Understanding how to measure a bike frame for size is a fundamental skill every cyclist should master. While it may seem complicated at first, it becomes simple once you focus on the key points:
Seat tube length = frame size
Inseam measurement = perfect fit
Combine these with proper charts, formulas, and real-world testing, and you’ll never struggle with bike sizing again.
Whether you’re riding through city streets, tackling mountain trails, or cruising long distances, the right bike size will transform your entire experience.